Wednesday, February 29, 2012

Get past it.

Remember my indecision of what to ply with the yarn on the bobbin (back on this post). Well I finally figured it needed a blue to both meld with the blue in the multicoloured yarn and to make the pinks pop out. I could have gone with a pink to hold everything together but that would have been, well, just too pink. It needed the blue. It called out for it. Here's the finished yarn.  
I am happy with it and it reminds me of a yarn I had 30 years ago, which raises a few, ummm, thoughts. Do you think I am trying to gain back those 30 years? Am I stuck on that yarn? Am I stuck on pinks and blues? It seems to me that whenever I dye fibre, somehow it always turns out pink and blue. My DH (dear hubby) keeps telling me to get past those pinks and blues. He's been saying that for years. Well, what if I just like pinks and blues, can't I stick with them? What if all my experimenting was to get to just this colour? What if I have arrived ...at pink and blue? Why do I have to get past it? I like it!

Sunday, February 26, 2012

For Mike

This post is for Mike, who passed away on Saturday. Much loved by family, friends, community, students, and colleagues.

Wednesday, February 22, 2012

It's a small world - or, a funny blog story

All of a sudden my blog receives 55 hits on one post--Spin 'til you drop'. I was pleased but frankly it wasn't an outstanding post, so why the interest and where did it comes from?  
Blogger keeps some basic stats, like number of hits that day or week, what country they came from and where they were referred from, and it was this that linked back to a Ravelry group - Spin and Dye Swap. So why would they be so interested? So I checked out the Ravelry group and read that someone in England had read my blog and sent a personal message to someone else on Ravelry, someone who lives in BC, saying 'I saw this photo of a wine glass, a spinning wheel and orange socks and thought of you.' 
To which the other person replied ' and why shouldn't it? It IS ME!'.  
I wonder what it was that made the English reader think of the other woman? The orange socks or the wine glass?

Saturday, February 18, 2012

All tangled up

[PhotoWoolee Winder]
So there I was, excitedly spinning up thick an' thin à la Jacey Boggs from a wild batt that I got at one of Jacey's workshops. A splendid spellbinding splash of colours and sparkles that mesmerized me, which is my excuse why the bobbin filled up without me noticing and there was a publicly embarrassingly terrible tangle of yarn on my Woolee Winder bobbin. Sarah helped me out by unraveling the snarl which required stretching it out halfway across the room, which happened to be filled with upwards of 50 spinners, while I wound it on the best I could. Like I said, this was publicly embarrassing.

[PhotoNot the right way to
 thread the Freedom Flyer]
Jeanette kindly brought a Freedom Flyer for an Ashford Joy, which Hummingbird Fibres (sponsor of this spinning retreat) was selling, to show me.  The Freedom Fyer was designed for wild yarns--big eyelets to guide bulky yarn onto the huge bobbin. Perfect for plying. With a gentle 'I couldn't help noticing ...' Jeanette hinted I may need this item. Couldn't help noticing?! Between Sarah and I we were practically stuffing that yarn under at least 20 spinner's noses. It only took a short time for me to bite the bullet, decide to, gulp, sell my beloved Lendrum to assuage my guilt on buying yet another spinning tool and buy a Freedom Flyer for my new Ashford Joy wheel.

[PhotoNote the jewelry
clasp between the spring,
and the line to the knob]
However, Mr. Ashford, are you listening? The instructions that come with the Freedom Flyer are not complete. I know, I know, how could you expect an idiot to not know how to thread it, or which wire circles were guides for the yarn and which wires circles were really clamps and not guides, and which way was up for those wire circles. But I am living proof that someone can screw it up. Yes, I did get how to put it on the wheel, and get exactly where to cut the fishing line for the tensioning, heck, I even knew to use a fisherman's knot to tire the line to the spring (add that to your instructions) but that's the distinguishing point between the adept, the setup at which I, if I may say so myself, excelled at, and the idiots (which I also excelled at being), in the actual use of the contraption. It is the practical threading and spinning in which I once again got tangled up. Again, and ahem, again. I tell you what, I will share my brilliant tensioning solution with you if you tell your graphics people to add a few diagrams to the instruction sheet.

[PhotoThe end that will clip onto the
existing screw]
So here's the problem with the tension line for the Freedom Flyer. It comes with a screw, fishing line and two springs (one for each end) and the idea being you unscrew the existing screw, spring and line (ahem, Mr A., something that should be mentioned...to us idiots) because it, the existing tension line, is too short for the bigger Freedom Flyer and bobbin. But that may work if I am never going to go back to my Woolee Winder (not a chance!) or regular Ashford flyer. No, I want them easily interchangeable. If I were to screw in and unscrew the screws all the time, the wood would fray and the screw would eventually fall out. So here is my elegant solution. 1) On the line attached to the tensioning knob, add a necklace-style clasp and use that clasp to connect to the spring on either the shorter or longer tension line. 2) On the screw end, add a jewelry clasp to the spring. 3) On the existing tension line you can either just let it hand down from the screw when not in use or add a clasp to the spring on the screw end. Voila. Interchangeable tension lines, just clip in the one you want. 
Now Mr. A. it is up to me to produce beautiful yarn that is worthy or the Freedom Flyer which I suspect I will fall in love with and I leave it to you to adjust those instructions.

PS. If anyone wants to learn how to spin wild yarns, check out Jacey's new hot-off-the-press book. It even comes with a DVD

Thursday, February 16, 2012

Spin 'til you drop

[PhotoSpin. Sip. Spin.Sip. Repeat]
[PhotoTools of the trade: spindle,
Ashford, Joy, Schacht Sidekick,  Lendrum,
Indian Head and traditional Ashford]
It has taken me a day (so far) to recover from a spinning retreat. Day one, go to work, go to lunch meeting, drive south, find the Lake Cowichan Education Centre, set up spinning wheel and spin, spin, spin, followed by dinner, then spin, spin, spin, sleep. Day 2, wake up, have breakfast, spin spin spin, eat lunch, spin spin spin, eat dinner, spin spin spin. Sleep. Day 3 eat, spin spin spin, eat, spin. Pack up and go home to spin.
I was amazed to watch Amy, who had just purchased her first wheel less than 24hr earlier. With only some spindling experience (for a total of less than 250 grams of fibre) behind her, she had jumped into the deep end, bought a wheel and signed up for an intensive spinning retreat. I mean, supposed she found she hated spinning in the second hour. What would she have done then? Something inside her must be driving her. By day 2, with a healthy 4 hours of spinning wheel experience under her belt, Amy was where I was at after a years' worth of spinning. By day 3, she was where I was at after 2.5 years of spinning! She was a natural! She was incredible. She was an inspiration.
And I was able to spin up three more homework assignments. Yes!

Friday, February 10, 2012

Knitting - Notes to self

What I learned and need to remember for my second and future knitting projects:

  • It takes 223 rows to start to understand what effect the knit, purls, increases, decreases, produce in a 10 row lace repeat pattern. Note to self: get recognizing the effects down to 10 rows.
  • If there is a border, do not, do not assume you have to do a YO. Note to self: Good, you are now recognizing what YO means. It is not part of K3 unless it says K3, YO!
  • Never leave home without stitch markers. Note to self: Use them!
  • Always use a life line for every start of the repeat pattern. Note to self: consider using one every second row.
  • Yes, you will notice the 5 rows of purls instead of 5 rows of knit, that I did in the first 3 inches and did not rip out and correct', Note to self: correct mistakes when they happen, even if you haven't even put in the first 10 row lifeline.
  • Read the whole pattern before beginning. Note to self: print the WHOLE pattern instructions, not just the chart and carry it with you, even to the bathroom. Read it. Again and again.
  • 2 ply yarn is just that, a yarn made from 2 singles plied together. Keep the plies together in the same stitch. Note to self: you are a spinner. You should know this.
And I haven't even finished my first project!


Sunday, February 5, 2012

A project for Cuba

Havana Cuba January brought a quick trip to Cuba.   This was a pure R & R trip.  With only seven days, the idea was to sit on a beach.  Oh, sure, I admit to having a weak, ill-thought out plan to find the bee hummingbird (the smallest hummingbird in the world) but once I saw the beach, that quest was put away for another trip. We did manage to drag ourselves to Havana for a short day where I found a group of women learning to knit, but then it was back to the beach and a couple of novels.
[PhotoA group of women
knitting in downtown Havana]
With hours of flights and just as many getting to the airport and sitting waiting for the plane, I decided I needed a project and since I am behind in my spinning homework, I thought it wise to pick a project that would get me a little further ahead in my homework.  For my major project this year, I have to spin a yarn and then knit or weave it into something.  From start (preparing the fleece) to finish (a usable product), the project should take 50 hours.  I have so far spent 25 hours sampling (1 hour), cleaning and teasing fleece (8hrs), blending and carding (4hrs)  fibres (40% mohair, 40% alpaca and 20% silk), preparing skeins for dying (2 hrs), mordanting (1 hr) and dying the skeins (4 hrs), plus 1 hour on calculations.  This was to be for a woven scarf, but at the end of all this work, my weft which was to be a soft pink turned into a rather gaudy, vibrant, purple.  I had enough purple for a scarf in itself.  I was still happy with the yarn a soft 2 ply suitable for weaving or knitting lace.  So if the planned weft was too harsh to go with the soft, subtle colours of the warp, then knitting would be a good alternative, except I can't knit anything more complicated than knit and purl and even then my knitting is questionable.  This I decided was the perfect time to learn how to knit and knit lace at that.
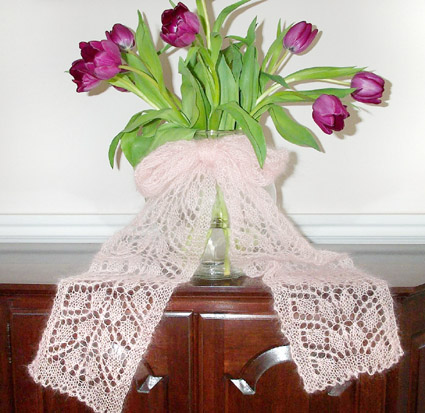
[PhotoMy first lace knit project]
So I 'googled' beginner knit lace and found this pattern from Knitty.com.    Perfect.  The description says it is good for beginners.  that's all the time I had to read before printing the chart, downloading a 'How to Knit ' app for the I-phone (complete with how-to videos, and packaging my purple yarn off I went to Cuba.
[PhotoFrom Knitty.com]
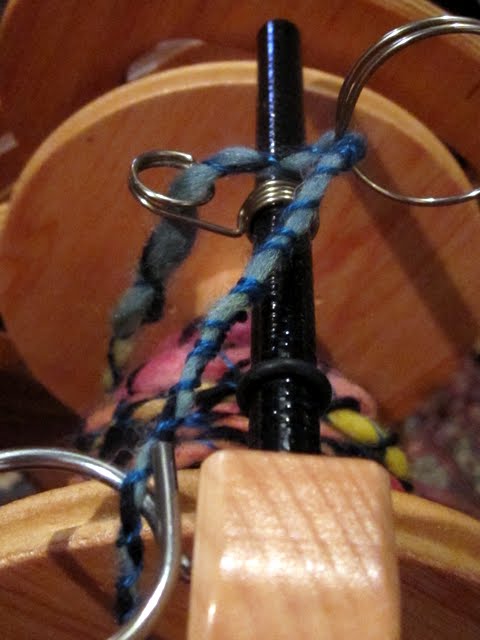
I want to point out a couple of items of interest in my photo of my WIP (Work in progress).  First, note the turquoise thingy, it is a Knit Kit, advertised as 'never lose your knit knacks ever again'.  I bought it from Knotty by Nature on my way to the airport, and am so glad I did.  It has a row counter, crochet hooks for those darned stitches you drop by accident, stitch markers, tape measure and even scissors apparently approved for air travel (personally, I think it is because they fold so cleverly that the x-ray machine can't see the sharp pointy bits).  If you are a knitter, never leave home without it.  The second thing I want to point out, is if you look closely about an inch below my needle is a blue yarn sewn into the knitting.  It's called a lifeline and it is. My knitting has improved but I tore apart the first 3 inches probably a dozen times, and even now, with a seasoned 164 rows behind me, I knit three rows ahead and often rip five rows back.  The lifeline allows me to rip back to the start of my ten row repeat pattern.  Every ten rows I use the handy dandy darning needle which came withe the Knit Kit and darn through the row.  Then when I have to rip out a few rows to get back on track, I can rip away right back to the lifeline without having any lost/dropped stitches.
On getting back home, I went back to Knitty.com to re-read everything and that's when I realized this wasn't actually a 'beginner's' beginner's project, it was for advanced beginners who are ready to tackle something more difficult. As the instructions say 'So, once you've knit this scarf you can knit just about any lace pattern.'  
And it is true ....I think.