Saturday, February 18, 2012

All tangled up

[PhotoWoolee Winder]
So there I was, excitedly spinning up thick an' thin à la Jacey Boggs from a wild batt that I got at one of Jacey's workshops. A splendid spellbinding splash of colours and sparkles that mesmerized me, which is my excuse why the bobbin filled up without me noticing and there was a publicly embarrassingly terrible tangle of yarn on my Woolee Winder bobbin. Sarah helped me out by unraveling the snarl which required stretching it out halfway across the room, which happened to be filled with upwards of 50 spinners, while I wound it on the best I could. Like I said, this was publicly embarrassing.

[PhotoNot the right way to
 thread the Freedom Flyer]
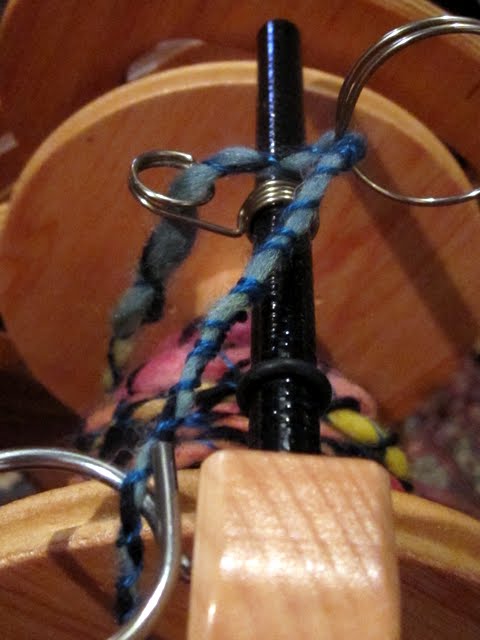
Jeanette kindly brought a Freedom Flyer for an Ashford Joy, which Hummingbird Fibres (sponsor of this spinning retreat) was selling, to show me.  The Freedom Fyer was designed for wild yarns--big eyelets to guide bulky yarn onto the huge bobbin. Perfect for plying. With a gentle 'I couldn't help noticing ...' Jeanette hinted I may need this item. Couldn't help noticing?! Between Sarah and I we were practically stuffing that yarn under at least 20 spinner's noses. It only took a short time for me to bite the bullet, decide to, gulp, sell my beloved Lendrum to assuage my guilt on buying yet another spinning tool and buy a Freedom Flyer for my new Ashford Joy wheel.

[PhotoNote the jewelry
clasp between the spring,
and the line to the knob]
However, Mr. Ashford, are you listening? The instructions that come with the Freedom Flyer are not complete. I know, I know, how could you expect an idiot to not know how to thread it, or which wire circles were guides for the yarn and which wires circles were really clamps and not guides, and which way was up for those wire circles. But I am living proof that someone can screw it up. Yes, I did get how to put it on the wheel, and get exactly where to cut the fishing line for the tensioning, heck, I even knew to use a fisherman's knot to tire the line to the spring (add that to your instructions) but that's the distinguishing point between the adept, the setup at which I, if I may say so myself, excelled at, and the idiots (which I also excelled at being), in the actual use of the contraption. It is the practical threading and spinning in which I once again got tangled up. Again, and ahem, again. I tell you what, I will share my brilliant tensioning solution with you if you tell your graphics people to add a few diagrams to the instruction sheet.

[PhotoThe end that will clip onto the
existing screw]
So here's the problem with the tension line for the Freedom Flyer. It comes with a screw, fishing line and two springs (one for each end) and the idea being you unscrew the existing screw, spring and line (ahem, Mr A., something that should be mentioned...to us idiots) because it, the existing tension line, is too short for the bigger Freedom Flyer and bobbin. But that may work if I am never going to go back to my Woolee Winder (not a chance!) or regular Ashford flyer. No, I want them easily interchangeable. If I were to screw in and unscrew the screws all the time, the wood would fray and the screw would eventually fall out. So here is my elegant solution. 1) On the line attached to the tensioning knob, add a necklace-style clasp and use that clasp to connect to the spring on either the shorter or longer tension line. 2) On the screw end, add a jewelry clasp to the spring. 3) On the existing tension line you can either just let it hand down from the screw when not in use or add a clasp to the spring on the screw end. Voila. Interchangeable tension lines, just clip in the one you want. 
Now Mr. A. it is up to me to produce beautiful yarn that is worthy or the Freedom Flyer which I suspect I will fall in love with and I leave it to you to adjust those instructions.

PS. If anyone wants to learn how to spin wild yarns, check out Jacey's new hot-off-the-press book. It even comes with a DVD

3 comments:

  1. It's not just me then *sighs with relief*

    I've just bought a new tension hook so that I could rig up a second brake line - then I realised that I'd have to unscrew the screw on the left... I'm really not happy having to do that each time. I love your solution :)

    And, like you, I wish there were instructions on threading the bally thing. And how to use the 'squeeze and slide' yarn guides. 'Cos I'm squeezin' an' slidin' and nuthin's happenin'...

    ReplyDelete
  2. Ah... I've just found this: http://www.ashford.co.nz/newsite/tutorials/video-tutorial-using-a-freedom-flyer-on-the-joy

    ReplyDelete
  3. Hi jombolom,
    thanks for the tutorial link. They should add the URL to the instruction sheet. It sure helps with the threading but they need to add a little squeezing and sliding ;-)
    Hope it's all working for you now.

    ReplyDelete